
Getting started with Git - Part 1

What is Git (or a VCS) ?
Your developer team may have a single developer or 100s, there are some best practices that stand true for any software development activity. Version Control or Source Control Management is one of them. Git is a distributed version control system authored by a genius, Linus Torvalds, who created it for his own use.
Source code should be kept under version control
Version control systems (VCS) track changes in a code base (source files, assets, docs in a project). There are several things that can go wrong during a software development process:
- refactoring going sideways
- devs losing track of what they were supposed to fix and wandering off
- broken builds or critical bugs requiring rollbacks
- working code being overwritten accidentally
- etc.
A VCS solves these problems by tracking every little change in the source files allowing developers to compare, review and revert their code to previous versions. A good VCS is the backbone of collaborative software development. Version control systems allow multiple developers to work on the source code concurrently without stepping on each other's toes.
Git is the most popular version control tool
Operating systems (both Linux and Windows), programming languages (Nodejs, Python) and popular software (Firefox, VLC media player) are some examples of large projects with their source code living inside a Git repository. As of June 2018, GitHub alone has over 28 million users and 57 million repositories (including 28 million public repositories), making it the largest host of source code in the world.
Using Git
Installation on Linux
Git is super easy to install. Running the following command will install Git on Ubuntu and most other Debian based distributions.
$ sudo apt-get install git
On a CentOS system, run
$ sudo yum install git
Apart from installation, git usage does not vary from one distribution to another. You can use almost any Linux distribution. To verify that git has been installed successfully, run
$ git --version
git version 2.19.0
Configuring globals
You need to configure a global username and email that git can use to store correct commit information. This can be changed later.
$ git config --global user.name "Ramit Mittal"
$ git config --global user.email "ramit@example.com"
Creating a new Git repository
Create a new directory for your app.
mkdir myapp
cd myapp
Initialize a git repo inside this directory. Git creates the .git sub directory which holds all the repository information.
git init
git init can also be used inside non-empty directories.
Write your code. We're going with a Hello World web server in Node, but you don't need to know Node for this tutorial. You may also right your own code and follow along.
const http = require('http');

const hostname = '127.0.0.1';
const port = 3000;

const server = http.createServer((req, res) => {
  res.statusCode = 200;
  res.setHeader('Content-Type', 'text/plain');
  res.end('Hello World\n');
});

server.listen(port, hostname, () => {
  console.log(`Server running at http://${hostname}:${port}/`);
});
You can test this out by running node app.js and opening localhost:3000 in your browser.
Making your first Commit
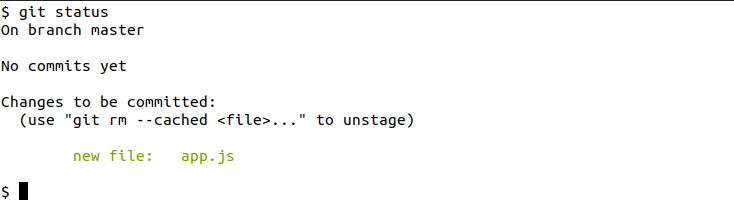
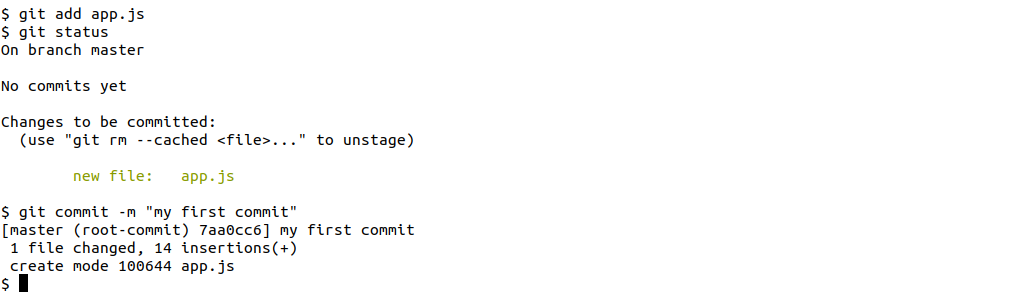
When you're sure that the code works. It's time to stage it. Staging prepares files to be added to the next commit.
git add app.js
You can use git add * to add all files in the directory, however, I would recommend against blindly adding everything unless you have to stage a lot of files.
At any time, you can run git status to figure out how far you've come since the last commit. You can also see the changes that have been staged for the next commit.
 It's time to commit. A commit is like a permanent checkpoint in the history of the repository (your source code). Committing changes is similar to saving a game before going to fight the boss monster in video games, so that you can load your game back if you die.
git commit
This will open up a text editor (nano is the default in Ubuntu) where you enter a commit message.
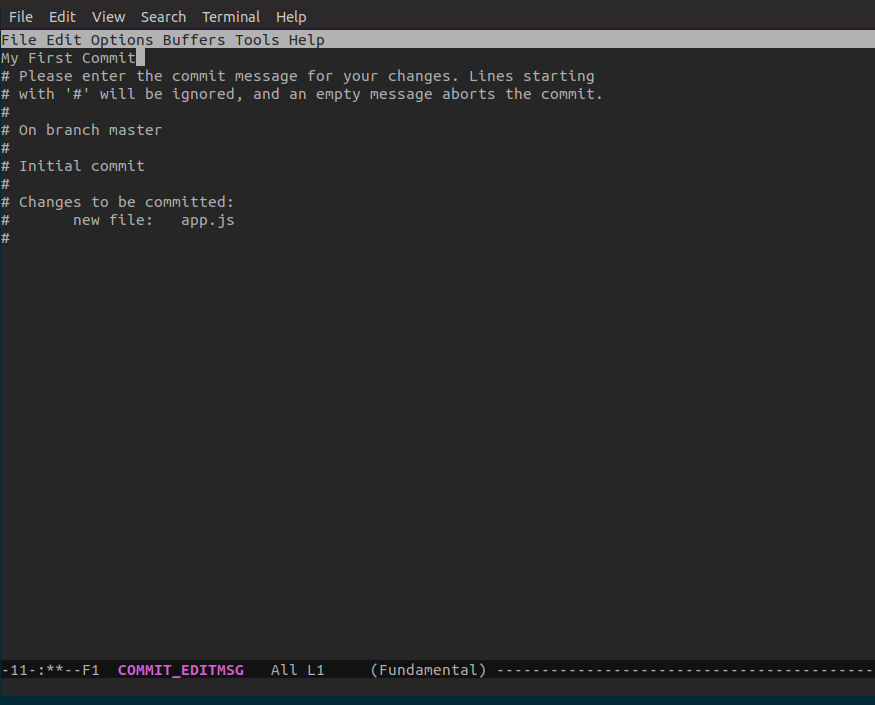 Go ahead and write your commit message and save the file. You can also specify a commit message directly on the command line by using
 git commit -m <message>.
Let's add a new feature to our app. We want to greet users by their name.
const http = require('http');
const url = require('url');

const hostname = '127.0.0.1';
const port = 3000;

const server = http.createServer((req, res) => {
    let queryData = url.parse(req.url, true).query;
    res.statusCode = 200;
    res.setHeader('Content-Type', 'text/plain');

    if (queryData.name) {
	res.end("Hello " + queryData.name + "!\n");
    }
    else {
	res.end('Hello World\n');
    }
});

server.listen(port, hostname, () => {
  console.log(`Server running at http://${hostname}:${port}/`);
});
After you've checked that it works, stage this file again and commit.
git add app.js
git commit -m "second commit"
Okay! We are writing code really fast, let's add our third feature. Our app should capitalize the first letter of the name when greeting the user.
const http = require('http');
const url = require('url');

const hostname = '127.0.0.1';
const port = 3000;

const server = http.createServer((req, res) => {
    let queryData = url.parse(req.url, true).query;
    res.statusCode = 200;
    res.setHeader('Content-Type', 'text/plain');

    if (queryData.name) {
	let name = queryData.name.charAt(0).toUpperCase() + queryData.name.substr(1);
	res.end("Hello " + name + "!\n");
    }
    else {
	res.end('Hello World\n');
    }
});

server.listen(port, hostname, () => {
  console.log(`Server running at http://${hostname}:${port}/`);
});
Going Backward
You've made a few commits and deserve a pat on your back. If you've followed along, you'd notice that git alters the way we think about the development process. Our approach to writing code itself has become version controlled. We've come a long way from haphazardly copying files for backups and creating a mess of incomplete but in-progress features. But the true power of Git lies in going backward.
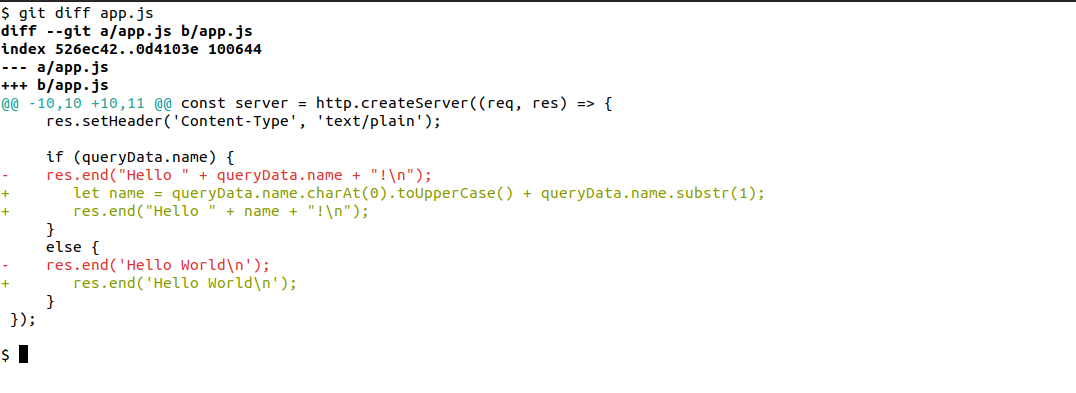
What if you decide that you don't want this new feature of capitalisation?
Comparing changes
Let's check what we've changed since the last commit. We can use git diff to see the changes.
By default, git diff compares the file in the working tree with the version of the file in the currently checked out commit (this will be explained later, but on a simple local repository like ours, it's the latest commit that we're comparing with).
Undoing changes
Discard the changes in this file by running git checkout -- app.js
 Notice the output of
 git status, we've got a clean working tree. Poof!!! The changes we made to the file since the last commit have magically disappeared.
Let's go back even further, undoing the last commit.
Viewing the commit log
Run git log to see the commits in to the repository.
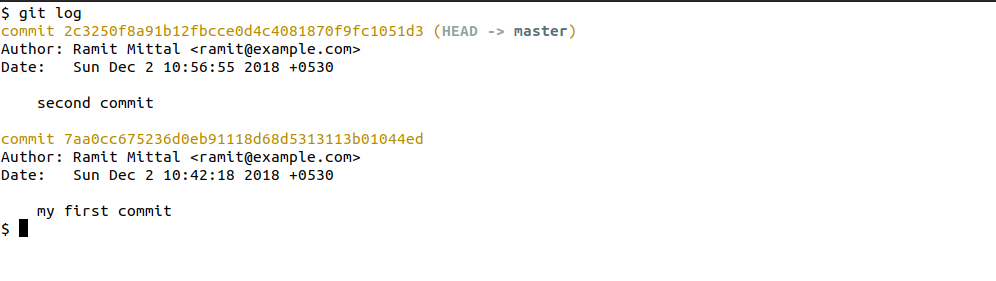
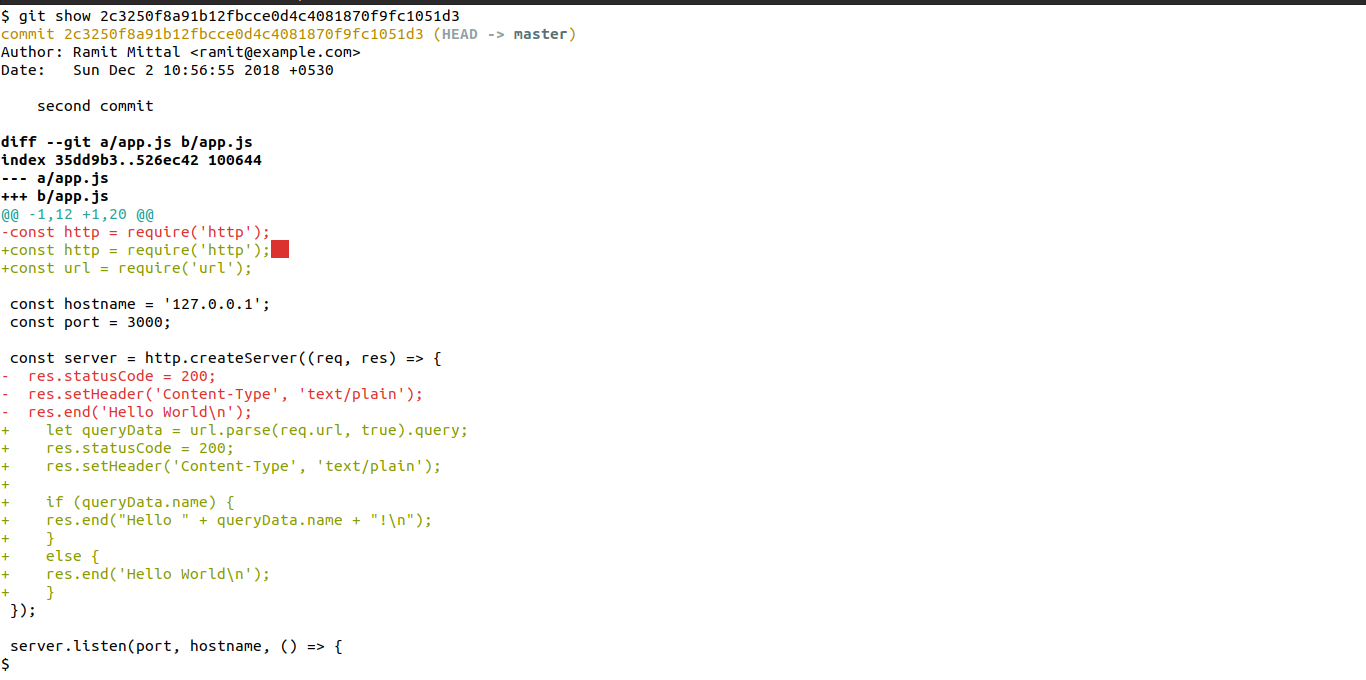
Every commit has a commit id associated with it. It's the long hex string in yellow. To see what changed in the second commit, run git show followed by the commit id.
You can use git log --oneline for a more terse output where everything is listed in one line. If you repository is small with not as many commits, only the first 7 odd characters of the SHA is good enough to uniquely identify a commit.
Resetting to a previous commit
Let's undo the second commit by running git reset with the commit id of the first commit.
git reset --hard 7aa0cc675236d0eb91118d68d5313113b01044ed
 If you open
 app.js now, you'll find that all the changes since the first commit have disappeared. We can also undo a commit and keep the changes in the working tree. The --hard flag removes the changes, the --soft flag only removes the commit, keeping the changes.
And forward again!
Now, let's modify the app.js file to say "Hello user!" whenever the name query parameter is specified.
const http = require('http');
const url = require('url');

const hostname = '127.0.0.1';
const port = 3000;

const server = http.createServer((req, res) => {
    let queryData = url.parse(req.url, true).query;
    res.statusCode = 200;
    res.setHeader('Content-Type', 'text/plain');

    if (queryData.name) {
	res.end("Hello user!\n");
    }
    else {
	res.end('Hello World\n');
    }
});

server.listen(port, hostname, () => {
  console.log(`Server running at http://${hostname}:${port}/`);
});
Now commit this file. This time, use a good commit message. A good commit message should contain information about the issue(s) fixed, features added or files changed.
And just like that, history has been rewritten.
Git has a lot of commands and might be too scary in the beginning. Here's a cheat sheet to help you out. We've covered some of the basics here. You should now be able to use git locally for your own projects. When using git, you will often find multiple solutions to a single problem. Also, best practices in version control will vary from one organisation to the next. The more you learn about Git and its workflow, the more efficiently you can manage your projects.
What next?
Well, stay tuned for upcoming articles and this series on Git. You will learn about various cross-platform GUIs for Git.
You may contact us for your software and consultancy requirements.

