

Getting started with Git - Part 2 - Github & SmartGit

In this part of Up and running with Git series, we'll tackle version control of a larger project, explore SmartGit, a GUI tool for working with Git, and explore the fascinating world of GitHub.
Starting with SmartGit
In part 1, we covered the basics of using Git for local repositories and learnt a few commands that it has to offer. We've barely scratched the surface so far. Remembering every Git command can be a daunting task for anyone starting out.
SmartGit is a Git client with a graphical interface which makes using Git a lot more intuitive. Using SmartGit, we can continue learning more about Git and good version control practices without having to learn every command-line option.
Installation
Installing SmartGit is very easy. Go to the
SmartGit official website and download the .deb package for Ubuntu. This .deb package opens up in the Ubuntu Software app, install it. Instructions for other operating systems are provided on the download page.
First run
Choose the type of license you want. Just keep the defaults for rest of the settings.

Open up the myapp repository that we created in part 1 by going to the Repository option on the Menu bar and clicking on Add or Create.

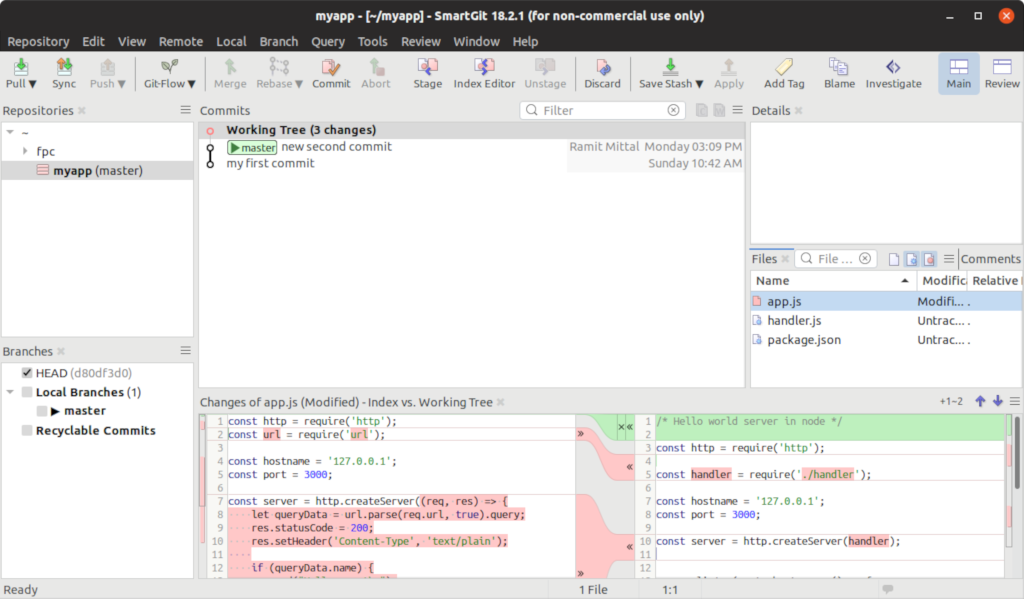
Right click on myapp from the Repositories section and click on Log. This opens the Commit log view of the repository.

You can see the commit log, commit details, and changes made in the commit. We are now ready to use SmartGit for all our Version Control needs. Let's add some more code to our app.
Adding more modules
We will start by creating an npm package out of our app.
Open up a terminal, make sure you're inside the myapp directory and run the following command
$ npm init
npm init helps you initialize an npm package.
Go through the interactive prompt, choosing defaults for most fields. npm creates a package.json file automatically for your project. Here's what my package.json file looks like.
{
  "name": "myapp",
  "version": "1.0.0",
  "description": "",
  "main": "app.js",
  "scripts": {
    "test": "echo \"Error: no test specified\" && exit 1"
  },
  "author": "Ramit",
  "license": "ISC"
}
Create a new file, name it handler.js. This file will contain our route handlers.
const url = require('url');

let handler = (req, res) => {
    let queryData = url.parse(req.url, true).query;
    res.statusCode = 200;
    res.setHeader('Content-Type', 'text/plain');

    if (queryData.name) {
	res.end("Hello user!\n");
    }
    else {
	res.end('Hello World\n');
    }
}

module.exports = handler;

Modify the `app.js` file.

```bash
/* Hello world server in node */

const http = require('http');

const handler = require('./handler');

const hostname = '127.0.0.1';
const port = 3000;

const server = http.createServer(handler);

server.listen(port, hostname, () => {
  console.log(`Server running at http://${hostname}:${port}/`);
});

/* I am a useless comment. Discard me !*/
Go back to the SmartGit window which now shows the changes. The Files section shows the files that have been modified. The Changes section at the bottom shows the changes in the file.
Staging and Unstaging
Select the package.json and handler.js files and click on Stage from the toolbar. You can unstage a file by clicking on the Unstage button on the same toolbar. These operations can also be done from the context menu by right-clicking on the files.

Staging Hunks
Let's come back to the app.js file. Check the right subsection of the Changes section. Right-click on the starting comment highlighted in green and select Stage Hunk. We have staged a part of the file. SmartGit makes it very easy to stage only parts of changes made to a file. Only the staged hunks are added to the next commit. Go ahead and stage all additions/deletions using the same method, except for the comment in the end.
Commit
Go ahead and make a commit by clicking on the Commit button from the toolbar.
 To discard the ending comment, click on the
 Discard button from the toolbar. The changes in app.js will be discarded.
Ignoring files
As our app grows, we will need to use 3rd party libraries. Let's add a date-fns library. To add the date-fns package as a dependency to our app use the command below:
npm install --save date-fns
This adds a bunch of files to the myapp folder.
 And, we might not need all of them in our repository. In fact, we generally don't maintain 3rd-party libraries inside our own repository. A fresh copy of the
 date-fns package is supposed to be installed by npm on any system that runs our code.

Git offers a way to ignore changes in a repository. Find the CHANGELOG.md file in the Files section, right-click on it and select Ignore.
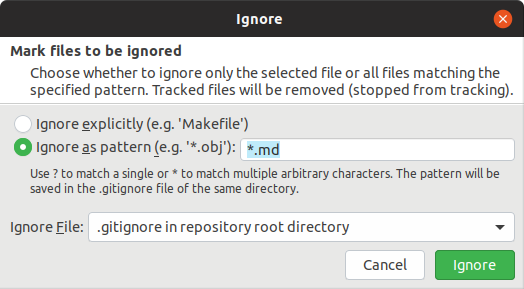
Note the options chosen in the Ignore window. We will put our .gitignore file in the root of the repository (our myapp directory). Any file name or glob pattern listed in a file named .gitignore inside the repository is ignored by Git. The node_modules folder contains the 3rd party libraries installed by npm. Let's add it to our .gitignore file. Click on Local on the Menu bar and select Edit Ignore File.
 Make the changes in the file and save it.
 SmartGit now shows only two changes, the whole
 node_modules folder has been ignored.
Later, we will use the date-fns library in our app. For now, stage the package.json and .gitignore files and commit.

Sharing code
It's no fun to work on our code all by ourselves. Git allows us to share repositories by using remotes. Every local git repository can be connected to a remote repository, which can stay in partial or complete synchronization.
A remote repository can live on any publicly available server (with suitable access controls, of course) and multiple developers connect their local repositories to the same remote to collaborate.
Github is the most popular service for hosting Git repositories. The ease of use and vast feature-set of Github also makes it the easiest way to share code among developers, host open-source projects and track code changes in large teams. Go ahead and sign up on Github if you are not already on it. It's quick and easy.
Github and Remotes
Now let's create a remote repository for myapp. Click on the new button in the repositories section on our Github dashboard.

Note that we have a bunch of options here. A public repository is visible to the world. A private repository is only visible to us or anyone we explicitly allow access to. To make a private repo, you must be a paid subscriber for Github (or any other similar service).
Bitbucket allows you to make a private repository for free. It has a different subscription model than Github and you may want to use that for private repositories for your next freelance project. Github can also initialize the repository for us but remember that we've already done that. Name the repository myapp and click on Create Repository.
You will now be redirected to the repository page. The Quick setup section contains the address of our repository.

Connecting to a Remote
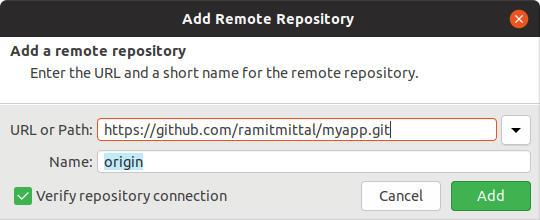
Open SmartGit, click on the Remote button on the toolbar and select Add. Enter the URL from the Quick setup section in the previous step. You can name the remote anything you want. It's popular practice to name the primary remote connection as "origin".
First push
We don't commit to a remote repository. Git uses a different mechanism to make changes in a remote repository, namely... pushing and pulling. Pushing refers to pushing changes from a local repository to a remote. To push all our commits to our Github remote, click on Push from the Remote option on the Menu bar. You will have to enter your Github username and password. Go back to the myapp repository page on Github.
 All of our code, along with the commit history has been synced.
Cloning
Go the Repository option on the Menu bar and select Close to close the currently opened repository. We will now clone the complete repository from the remote to our local machine. This will create a fresh copy of the repository on our machine. Normally, we wouldn't clone multiple copies of the same remote on a machine. A fellow team member or friend should need to clone our repository to be able to work on our code. Let's assume the role of a second developer and examine the cloning process.
Go to the Repository menu bar item and click on Clone. Enter the same repository URL as before and click on Next. Choose a new local directory for the repository.
 Open the local directory containing the new repository and run
 npm install.
Make some changes in this new copy of myapp. Our new version gets users excited about Fridays.
const dfns = require('date-fns');
const url = require('url');

let handler = (req, res) => {
    let queryData = url.parse(req.url, true).query;
    res.statusCode = 200;
    res.setHeader('Content-Type', 'text/plain');

    let greetString = "";
    if (queryData.name) {
	greetString = "Hello user!\n";
    }
    else {
	greetString = "Hello World!\n";
    }
    let friday = dfns.isFriday(new Date());
    if (friday) {
	greetString += "It's Friday!"
    }
    res.end(greetString);
}
module.exports = handler;
Open the Log view of this repository in SmartGit. Stage the changes in handler.js and commit.
 Push the changes. You can check Github and verify that the changes have been replicated in the remote.
Pulling
Open the previous copy of the local repository. You can find it in the left Repository section in SmartGit. Click on Remote button on the menu bar and select Pull. Both the local repositories are now in sync.

Great! We've stepped into the world of Github and hosted our first repository. In the next part, we will learn more about using version control in teams, branching, making pull requests on Github and Git workflows.
What next?
Well, stay tuned for upcoming articles and this series on Git. You will learn about various cross-platform GUIs for Git. Stay tuned for upcoming articles. You may contact us for your software and consultancy requirements.

