
The MEAN Stack - Introduction & Setup

If someone would have talked about JavaScript at the server side just a few years ago, he would have been laughing at. Yet, look at how things have shaped up today! Right from the database server, to the middleware, and to the front end, JavaScript is everywhere. It is the among top active languages on Github.

Source: githut.info
Introducing MEAN
The MEAN stack stands for MongoDB, ExpressJS, AngularJS & NodeJS. First of all, just because it is JavaScript from top to bottom in this stack, it doesn’t imply that everything is straightforward and simple. The programming paradigm is fairly different for each of the tiers. But since it is all JavaScript, at least you will have just one language to deal with :)
Setting up the Development environment
I will be using
WebStorm as my JavaScript IDE on OSX. They offer a 30 day trial too. After using multiple fantastic Text editors like Text Wrangler, Brackets, Sublime Text, etc. I found myself most comfortable with WebStorm. Suit yourself!
Step 1: MongoDB
Let's start with the backend, the database: MongoDB.
MongoDB (from humongous) is a free and open-source cross-platform document-oriented database program. Classified as a NoSQL database program, MongoDB uses JSON-like documents with schemas. MongoDB is developed by MongoDB Inc. and is free and open-source, published under a combination of the GNU Affero General Public License and the Apache License. == - Wikipedia==
- Download MongoDB and extract the files once done.
- I prefer to copy the bin folder to my home folder and rename the folder to
mongo. - You will need to add mongo folder to your Path. I have chosen ~/mongo as my home for Mongo. The command below will help you do that.
export PATH=~/mongo:$PATH
- There is an issue, though! You will have to enter this command every time in every terminal. You can get rid of this issue by updating your bash profile, like so.
vi $HOME/.bash_profile
- Add a line to the bash profile and save the file. Remember to change the folder name is you don’t like my location.
export PATH=~/mongo:$PATH
- You can now try to start the service.
- MongoDB’s default DB path should be created beforehand or you can create a folder anywhere and start MongoDB daemon like so (change your folder appropriately):
mongod --dbpath ~/Desktop/Workbench/MongoDatabases
- mongod should be up and running now. By default, it listens on 27017, so if there are any other applications using the same port, you may run into issues.
- How do we test it now? Run another terminal and type mongo.
- You will notice that the Mongo Shell opens up in one terminal and the other terminal will show a connection opened.

- To check if it is working properly, let’s try adding and viewing a record. You can try running a couple of commands, like so:
> db.books.insert({title: "MEAN Stack Rules"})
WriteResult({ "nInserted" : 1 })
> db.books.find()
{ "_id" : ObjectId("55f8023b30ac8b80bab090e0"), "title" : "MEAN Stack Rules" }
Cool! You have a database up and running. Now, if that doesn’t make you say wow, nothing will! Don’t underestimate the power of this NoSQL database. You can do way more with it than you realize.
Step 2: Node.js
Install Node from the website and simply setup using the package. It is the quickest way on OSX. It will take care of installing Node and NPM (which is the Node’s Package Manager). Fire a terminal and type:
node -v
I found that I am running v4.0.0 Let’s do a “hello world” and exit from Node by saying process.exit()
node
> console.log("hello world");
hello world
undefined
> process.exit()
You’re almost done!
Well, if you were thinking that you have more setup to do, I am sorry to disappoint you :) Whatever you had to do at the global level is pretty much done. Let’s get started with a simple application now. Mongod and Node are setup as your backend, and you need to simply hook them up with Express (middleware) and Angular (for front-end).
Start by creating a project folder helloWorldApp and getting into it the directory.
$ mkdir helloWorldApp
$ cd helloWorldApp/
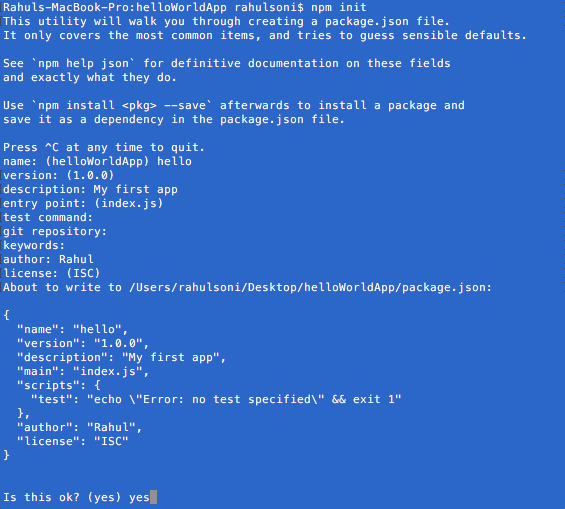
Initialize the project by saying npm init
It will ask a few questions (the answers can be updated later), and create a package.json file in the same folder where you have executed the command from.
So, you have your folder initialized as well. Let’s move on.
Step 3: ExpressJS
Express as its website defines it, is a minimal and flexible Node.js web application framework that provides a robust set of features for web and mobile applications. With a variety of HTTP utility methods and middleware at your disposal, creating a robust API is quick and easy.
Express is typically installed in the folder where your application resides. In our case, helloWorldApp. Execute the following command and notice how your package.json is updated with the dependencies!
npm install express --save
When I executed this command, my package.json file got updated like so:
{
  "name": "hello",
  "version": "1.0.0",
  "summary": "My first app",
  "main": "index.js",
  "scripts": {
    "test": "echo \"Error: no test specified\" && exit 1"
  },
  "author": " rahul soni",
  "license": "ISC",
  "dependencies": {
    "express": "^4.13.3"
  }
}
If there is something you simply want to test, ignore –save switch so that your package.json file is not updated. This is a very smart and easy way of updating your dependencies. Another benefit is that when you push it to a git repository, you can ignore the node_modules folder completely. That way, if anyone is pulling down your repo, he won’t have to download thousands of files. Instead, they can run npm install on the repo and get everything that they need.
Let’s check out an npm install. To do that, delete node_modules directory and simply run npm install. Notice, how the node_modules will be repopulated and you will be good to again due to the magic that happens due to package.json file.
Step 4: AngularJS
The server side is up and running already. We need to install bower now, which is quite similar to npm but meant for the client side dependencies. Just like package.json file, bower uses bower.json. Install bower next by running:
sudo npm install -g bower
Notice the -g switch above. It stands for global. You are telling npm to install bower globally. You won’t see any additions to your local application folder yet.
Just like you initialized npm, you need to now initialize bower by typing bower init and answering the questions.
Next command is where you start adding the client side goodness from all over the world. Let’s start with Angular!
bower install angular --save
Once it is over, you will see the bower_components inside this folder and you will also find bower.json. You are pretty much good to go with the setup!
Your MEAN stack is set up and ready to go!

